Here’s the deal: If your business is going to have a presence online, photos are mandatory. And if your business is a restaurant, you’ve got a goldmine of possibilities when it comes to visual content. Photos of tasty food, vibrant staff, happy customers, or even shots of the recently remodeled restroom (finally!) will capture attention and inspire your online followers to stop in for another visit.
Securing photos can feel like a daunting task — especially in the restaurant industry. Hiring a professional photographer is time-consuming and expensive. Plus, remember the last time you tried having your daughter stop in while she was in town to take some photos with the fancy camera you bought her for Christmas? The ovens went down, your floor manager called in sick, and there was a line out the door, so the whole thing was a bust. Luckily, capturing engaging photos to entice your online audience does not need to be complicated.
Solution: Use your smartphone. If you don’t have a smartphone, all of your employees do. No, seriously, all of them — go ask.
Give it a try: First, hold the smartphone in your hand and open the camera application. You’re halfway done. Next, point the camera at something appealing (refer back to first paragraph for suggestions). Finally — and this is where things can go awry — make sure the object is in focus and press the button to capture the image. Done. You’ve got a relevant photo to post on social media channels. Of course, there are details to consider when posting to various platforms, but right now, we’re focused on capturing basic photos.
Got a couple of extra minutes between your lunch and dinner rush? For better results, take a second to compose your photo properly and edit using tools available on your smartphone or downloadable apps.
If you still feel like you’re not cut out to snap smartphone photos for the purpose of social media –- delegate the task! Chances are, you have employees who would be happy to assist.
Our resident photographer here at Social High Rise, Heather Meyers, offers tips for producing an outstanding photo using your smartphone, which we’ve broken into three parts: Lighting, Composition, and Editing.
Lighting
The word “photograph” literally means “drawing with light” — it comes from two Greek words: photo, meaning “light”, and graph, meaning, “drawing”. Light is used to record a picture of a subject or scene, which is why good lighting is essential for taking great photos. There are features on smartphones to help aid in low/poor lighting situations. However, pushing your smartphone’s light sensor to its limits can introduce other issues that can impact photo quality.
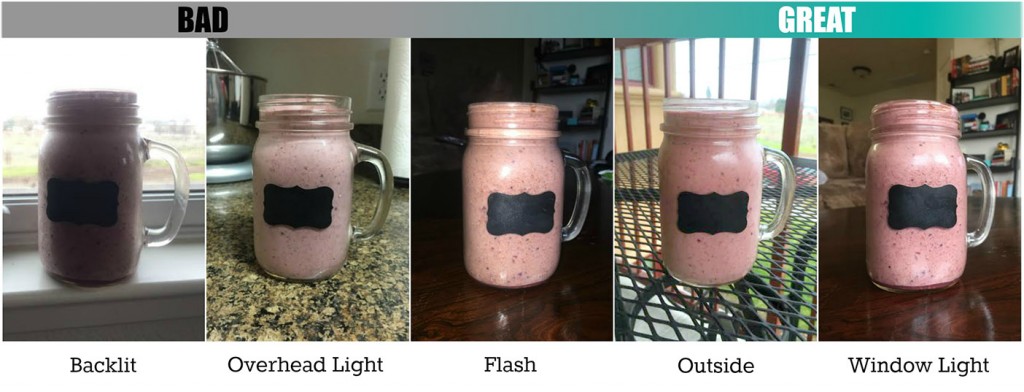
Here are some tips for capturing a great smartphone photo with proper lighting in mind:
- Backlit: Avoid snapping your photo directly into the sun or light source. While the result can sometimes add artistic flare (lens flare), your photo will lose detail and cause your subject to appear dark.
- Overhead light: Avoid overhead light (light bulbs that are directly above your subject). Similar to the rule of not photographing outside in direct sun between 10AM – 2PM when the sun is directly overhead, you want to steer clear of overhead light. The shadows will be too harsh and most likely that light bulb above is one of those icky fluorescent or tungsten bulbs mentioned previously.
- Flash: Ditch the flash if you can and find another source for lighting, to ensure background details are nicely captured. The built-in flash on your phone is just plain awful. It creates harsh shadows and if you’re photographing a person they will most likely be captured with the dreaded red-eyes.
- Outside: Go outside! Choose a shaded area closest to direct sunlight. Shaded areas will eliminate direct overhead light, however, don’t go too deeply into a shaded area or your light will be completely flat. Natural light, which is found outside, is light produced from the sun. While photographing in direct, overhead sunlight can be problematic, utilizing the shade outside during a sunny day can create a soft light effect. Cloudy days are great too, since the clouds produce a big softbox (light modifier) where they soften the brightness of the sun and produce softer shadows than direct overhead sunlight.
- Window: Get close to a window with natural light! By doing this you can utilize natural light, which is daylight color balanced and depending on the time of the day can appear cooler or warmer — morning being cooler light and evening being warmer light. As a result, colors and skin tones are more closely representative of what the human eye sees.
If all else fails and you’re still left with an image produced with poor lighting, throw a “black and white” filter on the photo using an app (see blog part 3), and bam — artsy!
 Want more tips? Check out parts 2 and 3, below:
[Coming Soon!] Restaurants: How to take Great Smartphone Photos for Social Media, Part 2 – Composition
[Coming Soon!] Restaurants: How to take Great Smartphone Photos for Social Media, Part 3 – Editing
Did you know?
We've been managing social media accounts for restaurants since 2012. For almost a decade, we've partnered with restauranteurs who are serious about using social media to generate business. Whether you're a good fit for our service or not, let's schedule a call and we'll give you free personalized advice on how to improve your social media presence. Either way, you'll walk away from the call more confident about your ability to promote yourself online - completely for free.

